How do I square my saw cuts?
Test cutting and squaring an Econom, Standard, Automat, Optisaw I, Optisaw I Plus, Optisaw II, Optisaw II, Optisaw Automatic & Standard TRK
The intent of these instructions is to accomplish this efficiently and accurately, with minimal amount of material usage. It is important the frame is level and is not sagging or raised in the middle. It is also important that the ends of the frame are equal and the frame is not twisted and the blade is not healing either vertically or horizontally. If required, refer to the frame installation procedure and the healing adjustment procedure. The larger the test piece, the more accurate the test, but the more effort it will take. If you do not have a helper, a full sheet of material will be very difficult to handle, because you will need to flip the sheet (not just roll it around) from top to bottom several times. Have the customer supply you with a good, flat sheet of MDF particleboard (may or may not be melamine coated). It should be a minimum of 3′ x 5′, but ½” material is fine.Testing For Square and Adjustment Procedure
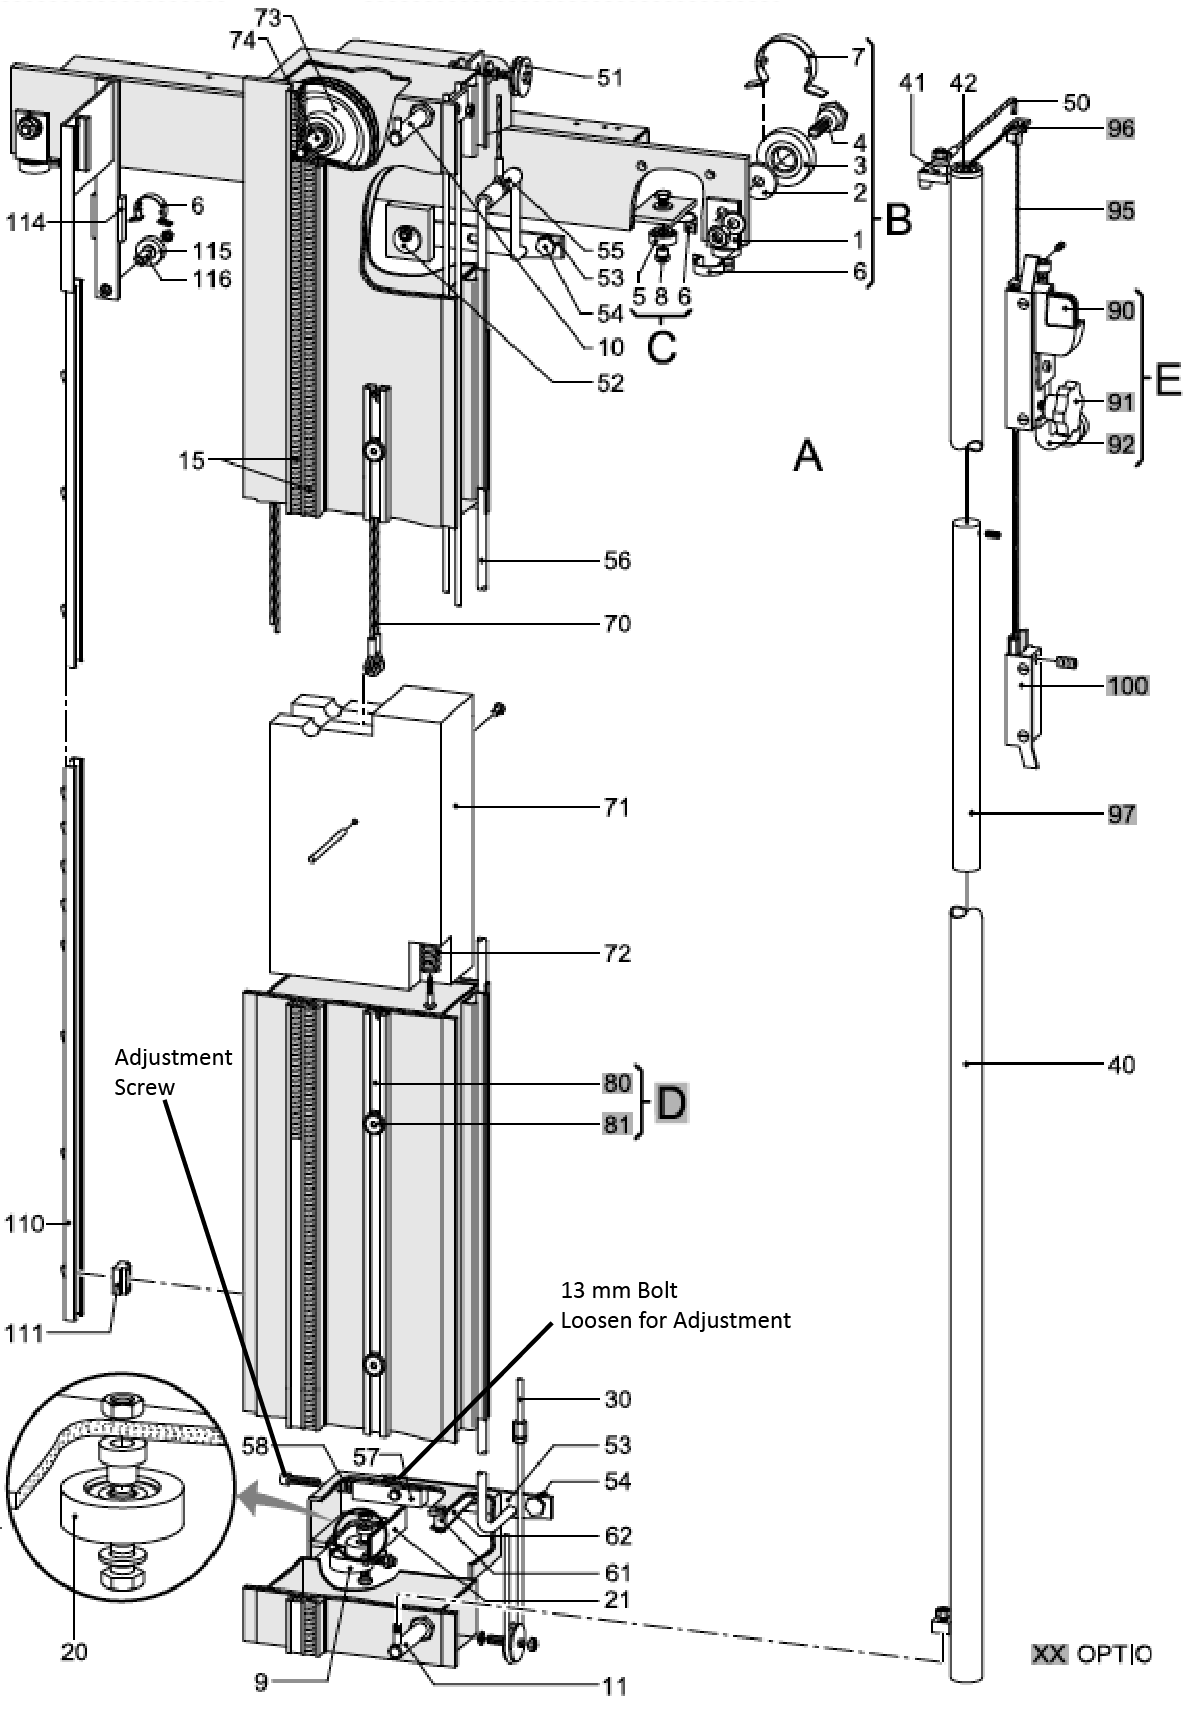
(Refer to the attached parts breakdown for adjustment location)
1. With the panel on the rollers, trim the top edge of the piece. Flip it top for bottom. Make another trim cut along the top of the panel. Roll it back and forth along the rollers and check to see if all or most of the rollers turn when you move the sheet. This will be a good preliminary indication of whether the frame is straight. If the rollers turn on either end of the panel but not in the middle, it’s a good indication the center of the saw is sagging a little and will need to be adjusted up, If the rollers are hit ting in the middle bit not on the ends, the frame is too high in the middle. Loosen the pinch bolts on the two center feet and make an adjustment with the adjustment bolt on the front of the feet. Another good indicator is to use a 4’X8′ sheet and while in the center cut station, make a vertical cut through the middle of the panel. Push both pieces together to ensure there is not a gap at the top or bottom of panels. If you are confident that the frame is level across the rollers, then proceed to the cut squareness testing.
2. With the saw in the center cutting station, trim the right side of the panel. Throw that piece away. Flip the panel the same way you did previously, top for bottom. Cut a thin piece (1/8-1/4″ approx.) off of the right side of the panel. Keep track of which end is from the top of the panel. Break the piece in two. (Hint: always break the piece so that the top is a shorter piece than the bottom; this will help you keep track of which end is which). Put the two square ends together, side-by-side, flat on the panel. Run your finger over the surface of the two pieces. Any difference in height is equal to twice the error over the height of the panel you’re cutting. Do not make any adjustment yet. Save the test pieces.
3. Roll the panel to the other side of the center cutting station and perform the same test on the left side of the panel. Trim the edge, throw that piece away, flip it, cut a test piece, break it in two, put the ends together, and feel for any difference.
4. If both test pieces have no noticeable difference between top and bottom, you’re in good shape and the saw is cutting square.
5. If the two test pieces from the center station are different from one another (either one side shows heavy at the top and the other side shows heavy at the bottom, or one side shows more of an error than the other), then you may have a beam slightly out of square, but do not adjust it (the beam) yet; it’s too early to tell. The first goal is to get the error to be the same magnitude. For example, if the test pieces from the panel on the left side of the cut have a difference in thickness (top to bottom of the test strip) of .050″, we want to adjust to frame to the point where the test pieces from the panel on the right side are off in the other direction by the same .050″. Then at least we know the rollers are straight, and we only need to make an adjustment of the beam to make the saw square.
6. To make an adjustment in the beam for squareness, that adjustment is made solely at the bottom of the beam. You should NEVER touch the top locking pin eccentric, and you should probably never have to adjust the large eccentric bearings that the beam rides on at the top of the frame. To adjust the beam, unlock it from a vertical station, loosen the 13mm hex head bolt on the top of the lower bearing assembly. Tum the Allen head cap screw on the left side of that assembly. Clockwise will move the bottom of the beam to the right; CCW to move it to the left. Tighten the bolt. Test for square again. Remember to always throw away the first trim cut before you flip the sheet. It’s the second strip that matters! If you’ve improved the error, you’re moving in the right direction; if not change the direction you turned the adjusting screw. Retest until the saw is perfectly square at the main cutting station.
Find More Troubleshooting Suggestions
Striebigs are extremely reliable when maintained properly. If you experience an issue and would like to troubleshoot independently, below are a few procedures to address them.
Please note: Some procedures refer to parts that may differ slightly from your Striebig model. If you have questions, please contact Colonial Saw.
Filter by Topic
Why am I cutting into my grid laths?
Replacing Grid Deflecting Device Assembly (C) Models – Econom, Standard, Optisaw 1, Optisaw I Plus, Optisaw II & Standard TRK machines With saw head horizontal: 1. Unhook thinner spring #56 from carriage safety brake bolt #21. 2. Back off Allen head set screw just below bolt #20 holding top of hollow rod with 3mm Allen…
See Full AnswerHow do I adjust the scoring blade?
OperationGeometry of a scoring cut The scoring and separating cut made on a plastic laminated panel is as follows if a two-part scoring saw is used for the purpose of scoring. Scoring saw blade A variety of scoring saw blades are available from the trade. The choice of the right scoring saw blade is not…
See Full AnswerWhere does the rod with 2 brass ends go on my saw?
Replacing Grid Deflecting Device Assembly (C) Econom, Standard, Optisaw 1, Optisaw I Plus, Optisaw II & Standard TRK machines With saw head horizontal: 1. Unhook thinner spring #56 from carriage safety brake bolt #21. 2. Back off Allen head set screw just below bolt #20 holding top of hollow rod with 3mm Allen wrench. With…
See Full AnswerHow do I replace the deflector mechanism?
Replacing Grid Deflecting Device Assembly (C) Econom, Standard, Optisaw 1, Optisaw I Plus, Optisaw II & Standard TRK machines With saw head horizontal: 1. Unhook thinner spring #56 from carriage safety brake bolt #21. 2. Back off Allen head set screw just below bolt #20 holding top of hollow rod with 3mm Allen wrench. With…
See Full AnswerWhy do my measured dimensions move when I plunge the head in to cut?
Adjusting the carriage locking (brake) mechanism 1. Remove the deflecting device as above 2. Loosen the setscrew for the backing screw (also on the left side of the carriage-shown just below the “Striebig” nameplate in the drawing) 3. Make adjustment to the backing screw #32 from behind with 6mm Allen wrench so that the screw…
See Full AnswerWhy are my cuts burning and chipping?
Parallel Guide (Healing/Tracking) Adjustment for Striebigs Models – Econom, Standard, Automat, Optisaw I, Optisaw I Plus, Optisaw II & Standard TRK 1. Test for healing by making a climb-scoring (or main-blade scoring) pass and returning back through with a finish cut. Retract the riving knife (splitting wedge) before cutting. The test is the same, but…
See Full AnswerHow do I square my saw cuts?
Test cutting and squaring an Econom, Standard, Automat, Optisaw I, Optisaw I Plus, Optisaw II, Optisaw II, Optisaw Automatic & Standard TRK The intent of these instructions is to accomplish this efficiently and accurately, with minimal amount of material usage. It is important the frame is level and is not sagging or raised in the…
See Full AnswerHow do I adjust the step out of my cut that occurs while backscoring?
Parallel Guide (Healing/Tracking) Adjustment for Striebigs Models – Econom, Standard, Automat, Optisaw I, Optisaw I Plus, Optisaw II & Standard TRK 1. Test for healing by making a climb-scoring (or main-blade scoring) pass and returning back through with a finish cut. Retract the riving knife (splitting wedge) before cutting. The test is the same, but…
See Full AnswerHow do I change a motor belt?
Procedure for Removal and Installation of Motor Drive Belt for Striebigs Models – Econom, Standard, Automat, Optisaw I, Optisaw I Plus, Optisaw II & Standard TRK 1. Disconnect power to saw. 2. Rotate head to the horizontal cutting position. 3. Position and lock carriage to a comfortable working height. 4. Open belt cover (item #8).…
See Full Answer