How to Build a Waterfall Edge Table
How to Build a Waterfall Edge Table with the Zeta P2 & Clamex P-14
Transcript:
This is Chris from Lamello. In this video, we’re gonna show you how to clamp waterfall countertop edges or thick mitered material. We’ve shown you in other videos how you can clamp together a three-quarter material—it’s very easy, it’s a one-step process.
Here, we don’t want to make one line of connectors across the middle because it will create a hinge joint. For such thick material, we’re gonna create a W pattern, which will spread the clamping force across the thickness of the material. I’m gonna do a hi-low pattern. I’m gonna do a couple of connectors high here on that edge and then one down here in the middle.
If you had a deeper countertop, I would alternate connectors maybe every eight or ten inches or so—high, low, high, low—so you have a W pattern of five across the width.
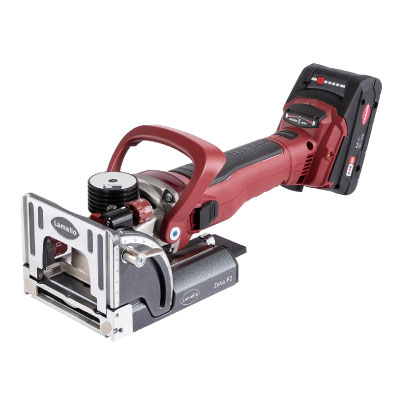
We’re going to work off of the short point in the middle for our low connector, and we’re gonna work off the long point for our high joints. What we’re gonna do for that is put the stop square on the front of our Zeta. As I mentioned, there’s a 45-degree detent right in the edge of the faceplate of the stop square. I’ve dialed the connector height down to around 18 or 19 millimeters. It’s sort of an arbitrary mark because this will keep me from blowing out through the long point once I make my slot.
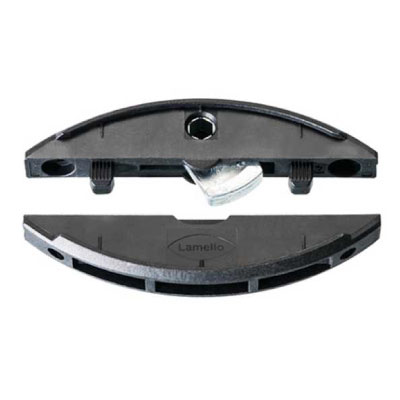
We’re gonna use the Clamex P14. I have my machine set at 14, and we’re ready to go. I’m gonna line up with the edge of my surface for the outside of my cut.
As you can see here, I’ve used a couple of parallel jaw clamps to fixture my long point. Of course, you could always work off the edge of your bench like so.
Now we’re going to make the short point connection. Normally, on any 3/4 material when making a mitered joint at the short point, we always use the 4-millimeter black red spacer plate that comes with the Zeta. But because the material is so thick, we don’t need it.
I happen to know this is a 45-degree angle, but as I’ve mentioned in other videos, if this were something different—like 28 degrees—you could put your flip stop on your piece and then dial the Zeta down until it indexes properly.
Here, I’m just going to make a couple of marks, essentially right down the book match on this veneer. If you have a lot of these to do, you could certainly make yourself a story stick so that you don’t have to make pencil marks or do any measuring.
Now I have my short point, and I’m just gonna line the center point of my Zeta.
That is my slot.
Now we’ll make the holes for the Clamex connector. We’re gonna use the drill jig that comes with the Zeta. This one doesn’t quite reach, so we’re going to use a long drill jig for the high connectors. In this situation, we just snap-fit the drill jig into place, dialing it down so that it just hits the surface.
We also have a long drill jig accessory, useful for situations where we’ve got a really long reach to get down to a deep slot. This fixture has a metal guide that holds it in place.
Make sure it’s lined up properly.
Remove any extra sawdust so it doesn’t interfere with the cams on the connectors. We’ll put all these in with the cam lock side up. Now, I’ll take the long drill jig accessory and run it down here to check my cam lock alignment before committing to putting everything together.
I might have a little bit of sawdust in this one. This is why we check. If you see, I didn’t quite get all the sawdust out, and it got jammed into the cam box. I’ll just set this aside and get another connector.
There we go—now we’ve got it. Now we put the female connectors in.
Of course, if you were going to glue this connection, you could have used tenons as well. But in this situation, as long as you don’t mind the six-millimeter holes in the bottom, the Clamex connection is going to make a very strong joint.
I’m actually perfectly flush right here.
Now we lock all the cams together—these clamps provide 200 pounds of clamping force—and we have a very nice waterfall edge.
That should work well on camera.
Thank you for watching! Like the video and subscribe to our YouTube channel.