 Skip to content
How do I free up a motor carriage that will not move?
There are two instances that can result in the saw carriage being stuck at the top of the beam.
Situation 1: The most frequent is that a copper bearing scraper has been rolled between the bearing and the ground bearing surface of the beam. This usually begins with the operator able to raise but not lower the carriage. The operator continues to test until the carriage is stuck at the top.
Solution: Get a good look at all the bearings in the housing and determine which the culprit is. A pair of needle nose pliers will work to extract the damaged scraper and return the saw to service. As a last resort consult the parts book and determine if the scraper can be freed by loosening the opposing bearing. Use extreme caution when altering the position of any carriage bearings! Do not add additional pressure when repositioning the bearing. To add additional pressure will likely crack the bearing race and cause extensive damage to the ground bearing surface. Call for assistance if you are unsure of what you are doing.
Situation 2: The second possibility is the Emergency Brake lever has activated as the result of the carriage banging against its upper limit of travel.
Solution: The Emergency brake on this machine is a spring loaded lever intended to rotate into position if there is no tension on the counterweight cables. The weight of the saw carriage forces the lever to bind into the rear ground bearing surface of the left side of the beam. This stops the carriage, protecting both the carriage and the operator. To release the lever the carriage must be pushed up slightly while a second person pulls upwards on the counterweight cables dislodging the lever. The cables can slowly be allowed to return to their natural position and the carriage can be moved down to a normal working height. Extreme care should be exercised with extra attention paid to protecting fingers when handling the counterweight cable. Pinching a finger with a 200lb.counterweight on the other end of the cable can cause physical damage!
After freeing the saw carriage examine the rear of the ground bearing surface where the Emergency brake lever had made contact. You will find disruptions in the surface. Use a flat file to remove the disruptions. Failure to do so will result in repeated locking up of the saw carriage! Call for assistance if you are unsure of what you are doing.
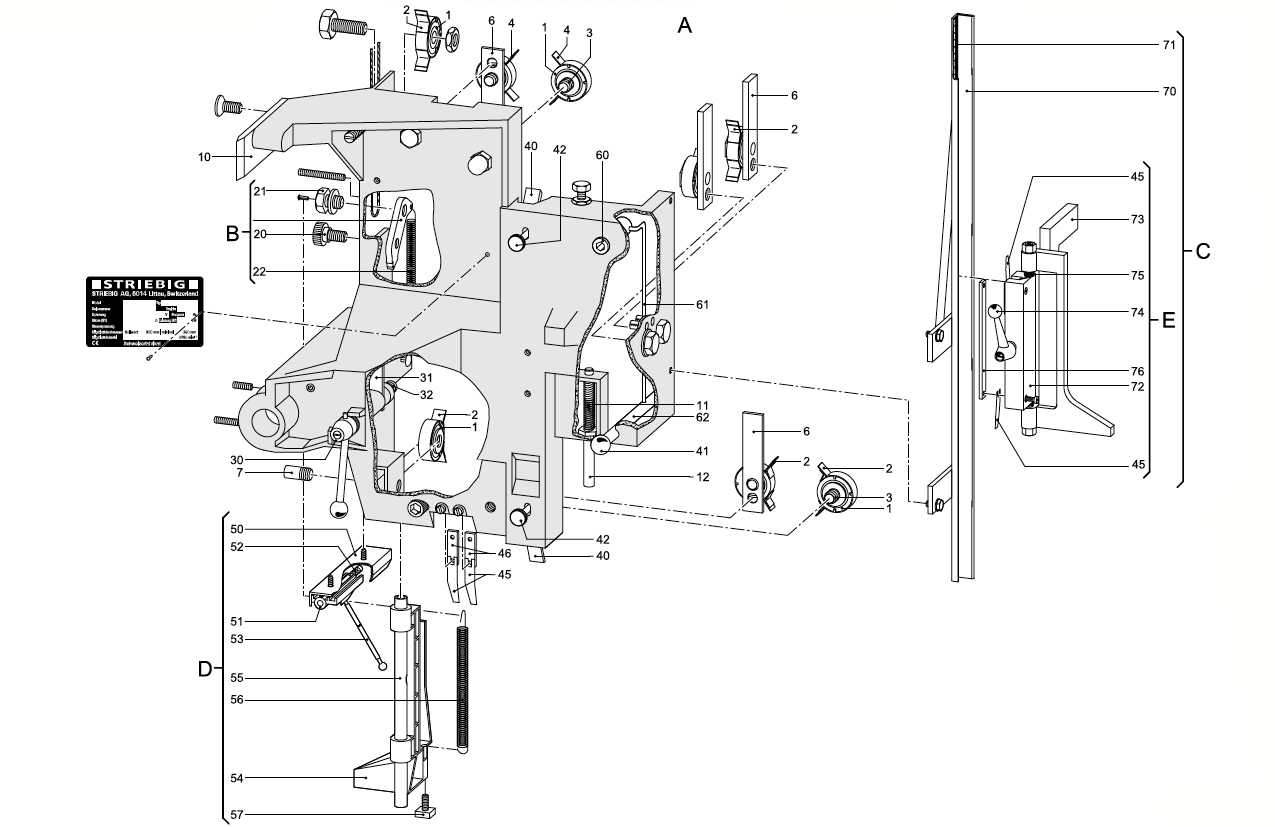
Situation #2 refers to the emergency brake which is position B in the attached parts breakdown.
Find More Troubleshooting Suggestions
Striebigs are extremely reliable when maintained properly. If you experience an issue and would like to troubleshoot independently, below are a few procedures to address them.
Please note: Some procedures refer to parts that may differ slightly from your Striebig model. If you have questions, please contact Colonial Saw.
Filter by Topic
Why am I cutting into my grid laths?
Replacing Grid Deflecting Device Assembly (C) Models – Econom, Standard, Optisaw 1, Optisaw I Plus, Optisaw II & Standard TRK machines With saw head horizontal: 1. Unhook thinner spring #56 from carriage safety brake bolt #21. 2. Back off Allen head set screw just below bolt #20 holding top of hollow rod with 3mm Allen…
See Full AnswerHow do I adjust the scoring blade?
OperationGeometry of a scoring cut The scoring and separating cut made on a plastic laminated panel is as follows if a two-part scoring saw is used for the purpose of scoring. Scoring saw blade A variety of scoring saw blades are available from the trade. The choice of the right scoring saw blade is not…
See Full AnswerWhere does the rod with 2 brass ends go on my saw?
Replacing Grid Deflecting Device Assembly (C) Econom, Standard, Optisaw 1, Optisaw I Plus, Optisaw II & Standard TRK machines With saw head horizontal: 1. Unhook thinner spring #56 from carriage safety brake bolt #21. 2. Back off Allen head set screw just below bolt #20 holding top of hollow rod with 3mm Allen wrench. With…
See Full AnswerHow do I replace the deflector mechanism?
Replacing Grid Deflecting Device Assembly (C) Econom, Standard, Optisaw 1, Optisaw I Plus, Optisaw II & Standard TRK machines With saw head horizontal: 1. Unhook thinner spring #56 from carriage safety brake bolt #21. 2. Back off Allen head set screw just below bolt #20 holding top of hollow rod with 3mm Allen wrench. With…
See Full AnswerWhy do my measured dimensions move when I plunge the head in to cut?
Adjusting the carriage locking (brake) mechanism 1. Remove the deflecting device as above 2. Loosen the setscrew for the backing screw (also on the left side of the carriage-shown just below the “Striebig” nameplate in the drawing) 3. Make adjustment to the backing screw #32 from behind with 6mm Allen wrench so that the screw…
See Full AnswerWhy are my cuts burning and chipping?
Parallel Guide (Healing/Tracking) Adjustment for Striebigs Models – Econom, Standard, Automat, Optisaw I, Optisaw I Plus, Optisaw II & Standard TRK 1. Test for healing by making a climb-scoring (or main-blade scoring) pass and returning back through with a finish cut. Retract the riving knife (splitting wedge) before cutting. The test is the same, but…
See Full AnswerHow do I square my saw cuts?
Test cutting and squaring an Econom, Standard, Automat, Optisaw I, Optisaw I Plus, Optisaw II, Optisaw II, Optisaw Automatic & Standard TRK The intent of these instructions is to accomplish this efficiently and accurately, with minimal amount of material usage. It is important the frame is level and is not sagging or raised in the…
See Full AnswerHow do I adjust the step out of my cut that occurs while backscoring?
Parallel Guide (Healing/Tracking) Adjustment for Striebigs Models – Econom, Standard, Automat, Optisaw I, Optisaw I Plus, Optisaw II & Standard TRK 1. Test for healing by making a climb-scoring (or main-blade scoring) pass and returning back through with a finish cut. Retract the riving knife (splitting wedge) before cutting. The test is the same, but…
See Full AnswerHow do I change a motor belt?
Procedure for Removal and Installation of Motor Drive Belt for Striebigs Models – Econom, Standard, Automat, Optisaw I, Optisaw I Plus, Optisaw II & Standard TRK 1. Disconnect power to saw. 2. Rotate head to the horizontal cutting position. 3. Position and lock carriage to a comfortable working height. 4. Open belt cover (item #8).…
See Full Answer